 By Ben Lewis, KNX Consultants.
There can be confusion when it comes to figuring out the best way to design the operation of lighting control dimmers. The flexibility of KNX means that there are several ways that it can be implemented, and the standardisation ensures that all manufacturers offer at least the same basic set of objects. This is known as the standard functional block for a dimmer. The objects included in the standard functional block are:
Switching (1-bit).
Relative Dimming (4-bit).
Absolute Dimming (1-byte).
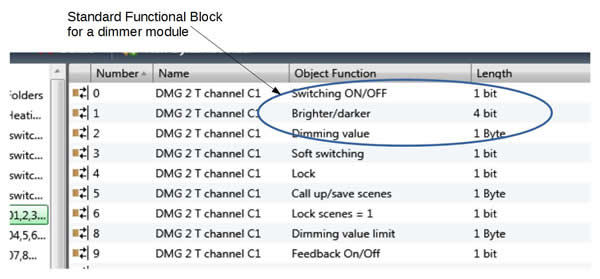
The biggest difficulty arises when trying to decide whether to use relative or absolute dimming objects. Manufacturers do try to assist by naming the objects as helpfully as they can. For example, the 4-bit object is sometimes labelled as ‘Brighter/darker object’, and the 1-byte is sometimes known as ‘Value input’. This is certainly helpful, but it might be useful to review what the function of each object is and how best to use it.
Switching (1-bit)
This object simply allows the switching on and off of the dimmer module. Different manufacturers offer different features, but it may be possible to set parameters such that the dimmer will switch on at a specific condition (e.g. 90% brightness, or the level before the previous switch-off) or in a specific way (e.g. immediate switch on, or switch on with a slow rise to the intended level). As suggested, these features are not a part of the 1-bit command per se, but they can be set in the parameters of the dimmer device.
So much for the simple on/off control of the dimmer. But what if we want to adjust the brightness level of the dimmer? Let’s consider each of the objects that allow this feature.
Absolute Dimming (1-byte (or 8-bit))
This object allows the programmer to define specific brightness levels at which the dimmer should operate. For example, the designer could set up a sensor to send a 1-byte telegram to this object. The dimmer will respond by setting its output to a brightness level defined by the value of the 1-byte telegram. The maximum value that can be represented by a 1-byte telegram is 255, so for example, if the value of the telegram is 255, the brightness level of the dimmer will set to 100%. Similarly, if the value of the telegram is 127, then the dimmer will set its brightness to 50% (actually, for the purist, the value is 127/255 which is 49.8%).
This object can be very useful, for example in the implementation of lighting scenes for specific functions. However, it does not help when the user simply wants to make the room a little brighter or would like to dim the lights. This function cannot be achieved using the 1-byte absolute dimming object. What is needed for this is the 4-bit Relative Dimming object.
Relative Dimming (4-bit)
This object allows the programmer to define the function that increases or decreases the brightness from its current setting, in other words, relative to the current brightness. It is useful to understand the mechanism that produces this effect. Built into the dimmer module is a parameter that defines a dimming ramp, the rate at which the dimmer module will increase or decrease its brightness.
Quite often, manufacturers will make this parameter available to the programmer for adjustment. So, for example a dimmer might be set such that it has a dimming ramp that would achieve a change from 0% to 100% brightness over a 10 second period. This dimming ramp can be initiated, and once in operation, the brightness will continue to increase or decrease (depending on the direction the dimmer was instructed to perform) until the brightness level reaches its maximum or minimum level respectively. Naturally, at this point the brightness level can change no further.
However, it is also possible to halt the dimming ramp by giving the dimmer a ‘Break’ instruction (also referred to as ‘Stop Dimming’). So, for example, for our dimmer which has a 10s ramp time, if it starts at 0% and its dim up ramp is initiated, it will begin to increase its brightness. If, say, it is sent a Break instruction 5 seconds after starting its ramp, the brightness will stop changing and the brightness level would be approximately 50%. The communications object that initiates the dim ramp and accepts the Break instruction is the 4-bit Relative Dimming object.
If we consider the example of a pushbutton sensor set up for dimming operation, the pushbutton’s communication objects will include a 4-bit object that will transmit the ‘start dimming ramp’ when the button is held pressed, and it will transmit the additional ‘Break’ telegram when the pushbutton is released. The resultant user experience is that when the button is pressed and held, the corresponding lighting circuit will dim from its current brightness and will stop at a new brightness level when the button is released.
Using this method it is possible to reach any brightness level for the lighting circuit from 0% to 100% using a single press of the pushbutton.
Conclusion
Using the objects included in the standard functional block, it is possible to have comprehensive control over KNX lighting control dimmers, from simple or conditional on/off switching, through dimming to absolute light levels, to relative increases/decreases from the current level.
Ben Lewis is Director and Principal Consultant with KNX Consultants Ltd. which offers a full spectrum of KNX-focused services tailored to meet the needs of the professional client, ranging from complete project design work through to KNX Certification training and business development support. KNX Consultants works mainly with systems integrators who have specialisations in other fields such as custom AV installation or interior architecture, but see the demand to include KNX capability within their portfolio.
