
By Mark Warburton, Ivory Egg.
When controlling lights individually with KNX, a common complaint is that the buttons don’t correctly show the status of the lights and require two presses to operate. This is caused by not setting up the feedback status correctly.
Looking at each of the group addresses below, namely 1/0/1, 1/0/11 and 1/0/15, one sensor object is connected with either one or two actuator objects.
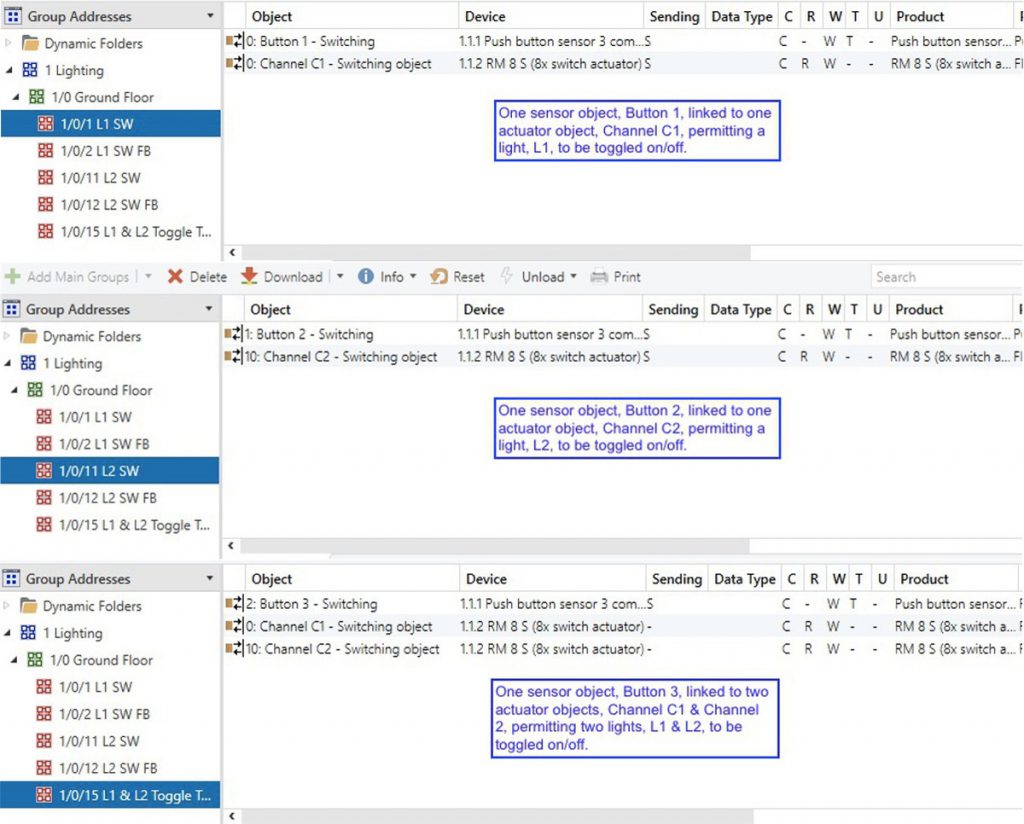
If only Button 1 is used to toggle L1 and only Button 2 is used to toggle L2 then the cycle of ON/OFF will keep going and the lights will switch as expected.
However, if Button 3 is used to toggle L1 and L2, the next time that Button 1 or 2 is pressed, they will be out of sequence and a second press will be required to turn the light on, or off.
Using a ‘listening’ object
This problem is overcome by pairing the feedback status of each circuit with the switching object from the keypad in a separate group address. Because a sensor can only send its value or command to one group address, this second assignment becomes a ‘non-sending’ or ‘listening’ object. It is possible to tell which is the sending group address as it will always be the first group address listed against an object, and is also indicated by ‘s’ in the sending column in the group address.
When a value changes in the feedback group address the listening object will update the status of the button, but unlike the sending object, it will not send a value on the bus.
In the below pictures, the feedback group addresses 1/0/2 for L1 and 1/0/12 for L2 include the ‘listening’ objects for each push button along with the status object from the relevant actuator channel.

When the feedback object of the actuator sends an ON or OFF, this will cause:
A) The status LED on the relevant button to turn on or off
AND
B) The internal states of the push buttons relating to that light to be set to match the actuator’s current state.
When Button 3 is pressed (1/0/15), L1 and L2 will turn on. The feedback group addresses (1/0/2 and 1/0/12) will update buttons 1 and 2 that their corresponding lights are on, so when Button 1 or 2 is next pressed, the associated light will turn off. At this stage, Button 3 will also know that one of the lights is off, so when Button 3 is next pressed it will turn on both of the lights (the next step in the toggle cycle).
When L1 is turned on with Button 1, Button 3 will also know that L1 is on, so when Button 3 is pressed, it will turn off L1 (the next step in the toggle cycle).
Conclusion
This method works when the buttons have been configured to show the status based on the switching object. If a separate object is available to update the status, this can be used in the feedback group address instead of the switching object.
The problem can also occur when lights are controlled from an external visualisation or AV control system, as the push buttons won’t know the current state of the light. They will just perform the next action in the cycle which may result in double-presses. The above method will solve this, plus the feedback group addresses can also be used to ensure buttons and icons in the external system are always in sync with the circuits.
Mark Warburton is a Director of Ivory Egg (UK) Ltd, a supplier of leading KNX products and provider of KNX training courses.
