 By Miguel José Gamboa Soares, EURODOMÓTICA.
The Problem
More and more KNX supervision software packages use KNXnet/IP for connection to a KNX network. For this reason ETS does not have KNX equipment with the necessary group objects to link to a group address. The consequence is that you have to create the necessary filter tables of the line couplers and/or area couplers.
Back to Basics
Let’s review some simple concepts. For example, how a pushbutton in one line, controls a switch actuator in another line; and how a telegram goes from one line to another line in the same area and in different areas.
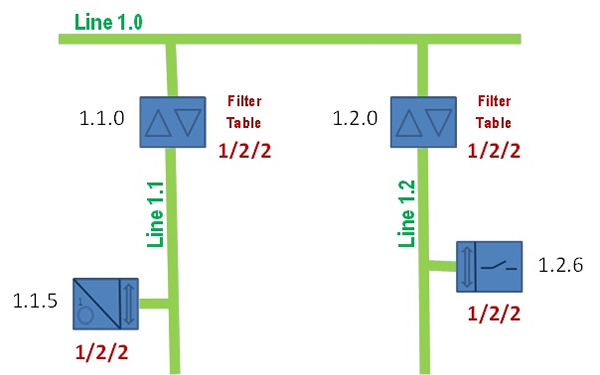
In Figure 1 above, for the KNX pushbutton 1.1.5 to control the switch actuator 1.2.6, we have to associate the group objects from both the pushbutton 1.1.5 and the switch actuator 1.2.6 with a group address (for example 1/2/2). For the telegram sent by the pushbutton in line 1.1 to reach the switch actuator in line 1.2, it has to cross the line coupler 1.1.0 to the area main line and then the line coupler 1.2.0 to the 1.2. For this to happen, ETS automatically puts this into the filter tables of the line couplers when you connect both KNX devices to the group address 1/2/2. For this reason, apart from downloading the pushbutton and the switch actuator, you also have to download the group addresses to the line couplers.
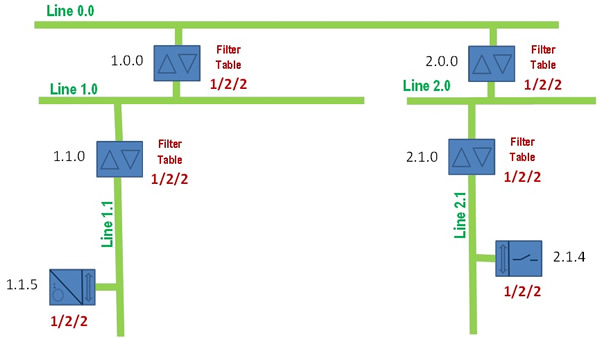
Figure 2 above shows that the same thing happens when the pushbutton 1.1.5 needs to control a switch actuator 2.1.4 connected to a different area. But now when you connect the object groups from both devices to the same group address 1/2/2, ETS inserts this group address not only in the filter tables from the line couplers 1.1.0 and 2.1.0, but also in the area couplers 1.0.0 and 2.0.0. In this case, you have to remember that you also have to download the new filter table not only the line couplers, but to the area couplers too.
Remember: in order for a telegram to be routed to a line/area coupler, two conditions must be met:
1) The target address (group address) in a telegram has to belong to the filter table of the line/area coupler.
2) The routing counter has to be higher than 0.
During normal communication, when the telegram is sent, the routing counter is equal to 6, and each time it crosses a line coupler or area coupler (as well as the line repeaters) it is decreased by one unit. This is used to avoid the continuous circulation of a telegram through a KNX network with an error in the installation. For the issue this article covers, it is not of fundamental importance, but it is referenced since it is one of the conditions for a telegram to be routed to a line/area coupler.
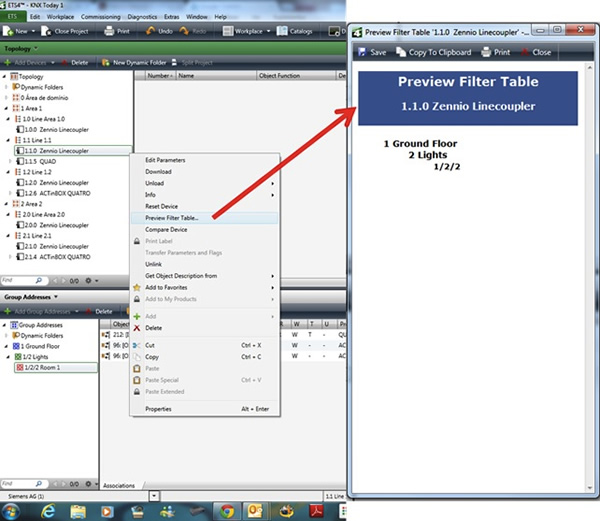
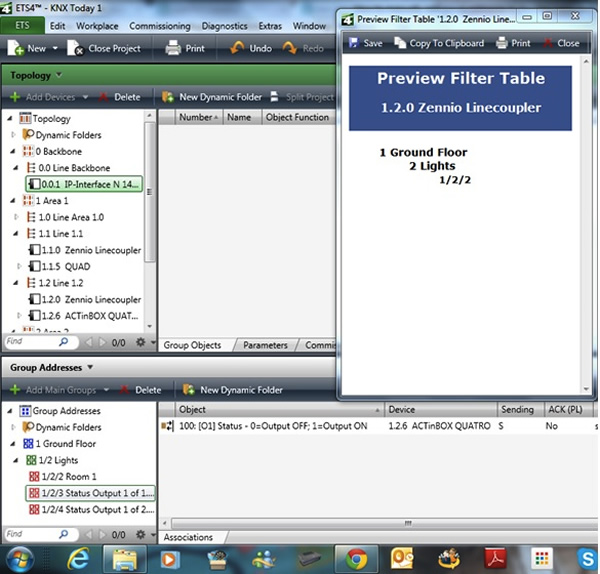
As we have seen, ETS automatically creates this filter table each time you link the group objects to the group addresses. If you take a look at the simple project created, once you open the filter table of each line/area coupler after linking the group objects, you can see each group address belonging to the filter table, as show in Figure 3.
Remember that for the line/area couplers to have the filter table loaded into their memory, you have to download their application program with the group addresses.
Note: Remember that each time you make any modification to the installation, such as creating another connection that affects the filter tables, you must not only download the KNX devices where you have made the modifications but also download again the line/area couplers for each filter table that has been modified. This is a very common mistake – we always remember to download the equipment for which we have made changes, but forget that the filter tables of the line/area couplers have also been modified automatically by ETS.
Adding Visualisation Software via an IP Interface
As recommended, if you have just one area, then all central interfaces should always be placed on main lines. If you have more than one area, you should place all central interfaces on the backbone line (Line 0.0). This reduces the number of telegrams in the KNX network.
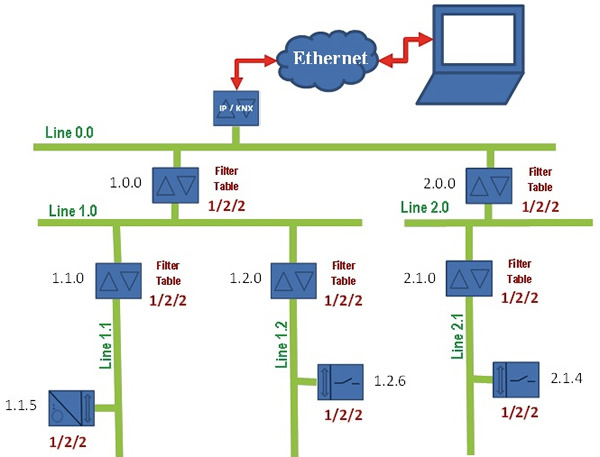
Using our previous example, we are now going to place an IP interface where our visualisation software communicates with the network. To keep things simple, we are just going to add two group addresses: one for the status of output 1 of the device 1.2.6, and the other one for output 1 of the device 2.1.4, as shown in Figure 4 below.
When we include the group addresses for the status, we see that we have only the group object from the KNX actuators, and there are no communication groups on the side of the IP interface. If you check the filter table of the line/area couplers, you can verify that there are no changes, since we have not connected the group address to any device in the backbone, as shown in Figure 5 below.
So how do we solve this situation? There are two solutions, each with its pros and cons:
1) Manually add the group addresses to the filter table of the line/area couplers.
2) Use a dummy device to automatically include the group addresses in the filter tables.
Manually adding the group addresses to the filter table of the line/area couplers
To manually add the group addresses to the filter tables of line/area couplers, you must push the group addresses from the Group Address view to the respective lines in the Topology view. But you have to be very careful to push the group address to the line area and to the backbone, otherwise if you just push the group address to the backbone line, this will just be added to the area coupler and not to the line coupler. So, you also have to push the group address to the line area if they are to be added to the filter table of the line coupler.
The big disadvantage of this method is that you have to make the links carefully for each line/area coupler, and you can only see the links if you look at the preview of the filter table of each line/area coupler.
Using a dummy device to automatically include the group addresses in the filter tables
A dummy device is simply an image of a device that represents the visualisation device. This allows us to introduce a device in the backbone line and link group objects to the address groups that we want to transfer to the backbone line.
You can download these dummy applications from KNX Member web pages directly. These have been developed by KNX members specifically for this purpose, and they are very easy to use, but you can also use any other device as long as it accepts several connections, but make sure that you correctly identify such a device as a dummy and not as a real device.
As you can see in Figure 6 below, if you introduce a dummy in the backbone line, you can now link group objects with the group addresses you want to connect to the backbone so that the visualisation software can check their values.
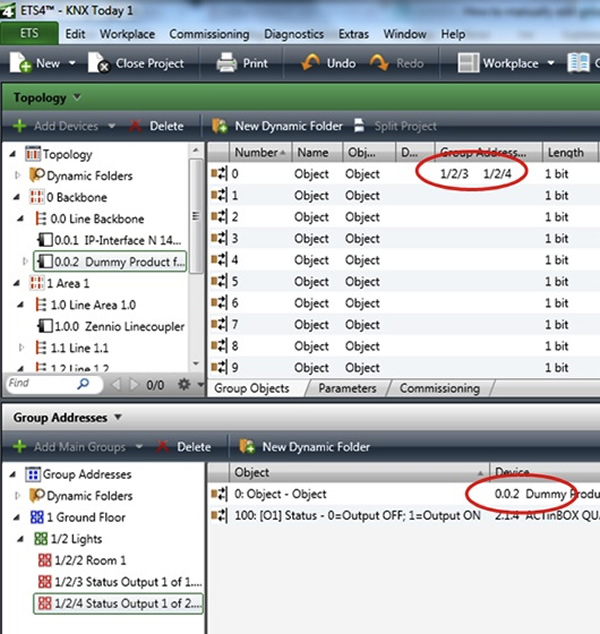
The big advantage of this technique is that you can easily check that each group’s addresses are connected to the backbone for the purpose of communication to the visualisation software, either by looking at the object groups of the dummy device or looking for the object groups inside each group address. The dummy has several object groups, and in the parameterisation of the dummy, you can select the dimension of the group objects.
Miguel José Gamboa Soares is a KNX++ Tutor with EURODOMÓTICA – Tecnologias em Automação KNX, the first manufacturer-independent KNX training centre in Brazil. EURODOMÓTICA also provides international engineering, consultancy and KNX distribution services, as well as providing consultancy on building automation and energy efficiency solutions.
You are welcome to comment on this article below.


