 By George Lazos, Quantum KNX++ Training Centre.
The Problem
Lighting is an important part of a building’s character. Its control is crucial, as it affects the occupants’ mood and helps them experience their way of living in a more interesting way. A successful lighting design must fulfil the customer’s needs, not only functionally, but aesthetically too. It may for example, be required to be activated at appropriate times in appropriate places, or to highlight certain areas or features whilst detracting from others. It must not irritate the customer in any way, otherwise the finger of blame may end up pointing at the lighting designer or the KNX professional, or both.
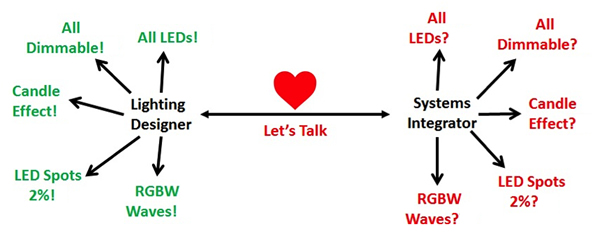
In too many instances however, the two parties, despite having a common objective, act like strangers, which unsurprisingly results in lighting that does not work as desired or as designed. That seems to happen because:
• The lighting designer is unaware of the available range of lighting controls, lighting technologies, systems integration technologies, and what their benefits and issues are.
• The systems integrator is unaware of what lighting means, what the lighting designer wants and which technology and tools are necessary in order to achieve the best results.
Thus, it is crucial for both parties to sit down and analyse in detail all of the critical factors if they wish to deliver lighting that meets the customer’s expectations.
The Solution
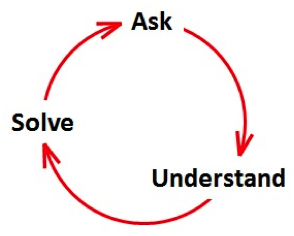
If we ask the right questions, we stand a good chance of understanding what is required and so finding the right solution. I therefore strongly recommend that systems integrators and lighting designers adopt the ‘Ask/Understand/Solve’ process at the earliest opportunity in order to reveal all of the lighting issues and help them work together for the best lighting results.
To help in this process, I have created the Lighting Table Tool, which I use regularly at the start of projects. As a first step, the systems integrator should give this to the lighting designer to fill in. It is clear that they are the artist of the project, so whatever their knowledge is about lighting controls, this tool will cause questions and force them to be more clear and specific about which lamp types are required, their wattage, way of control, type of control etc.
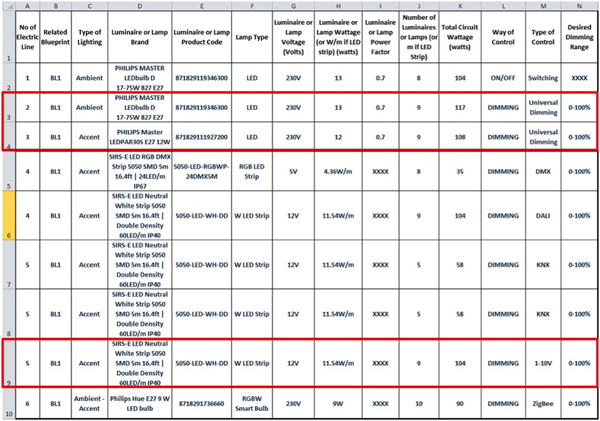
Depending on the knowledge of lighting and lighting controls that both parties have, it sometimes helps to split the Lighting Tool Table into two parts as shown above, where Part A is more geared towards the lighting designer and part B more towards the systems integrator. This is not a hard and fast rule, but the idea is to provoke a creative ‘lighting discussion’ that, in most cases, can end up with a great lighting result.
In particular, the ‘Desired Dimming Range’ (column N), should cause questions such as ‘What do you mean by dimming range? Of course I want 0%-100% in every lighting circuit.’ That is a good point to start the conversation as there are restrictions, especially when using LEDs for lighting, as is the current trend. On the other hand, the systems integrator must find the right technology that fulfils the lighting specifications of the Lighting Table Tool, and this is not always an easy task.
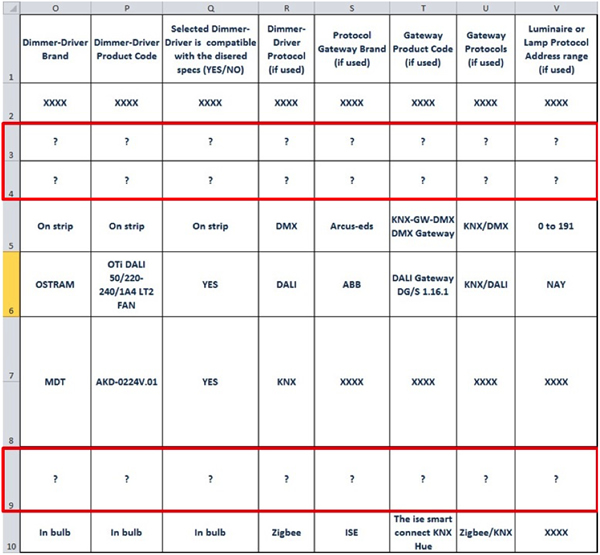
For example, in Figure 3, lines 3 and 4, the lighting designer demands 0-100% dimming range for two different retrofit LED lamps working at 230V. While choosing a dimmer, you could face compatibility problems and restrictions depending on the dimmer and the LED lamps. In more detail, as you can see in Figure 5 that there are restrictions in the dimming range (only 15% -100%) and the number of lamps per dimming circuit.
Clearly, it is not as easy as when dimming incandescent lamps.
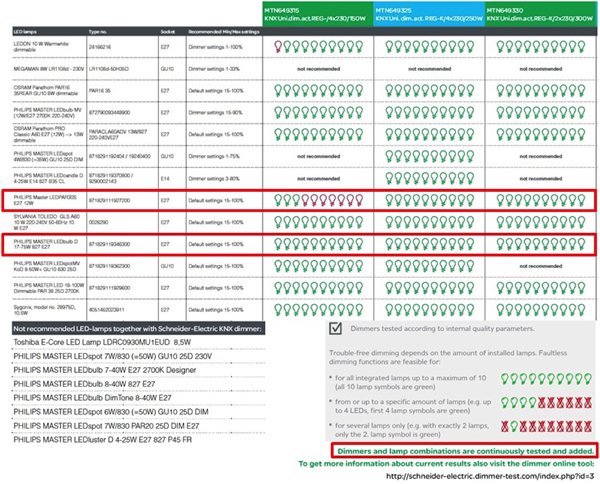
There are two things to note. Some LED lamps are not supported by dimmers, and all of these compatibility tables that are provided by the various companies that create dimmers, are constantly developing. Hence you will see notes such as ‘Dimmers and lamp combinations are continuously tested and added’ as in Figure 5.
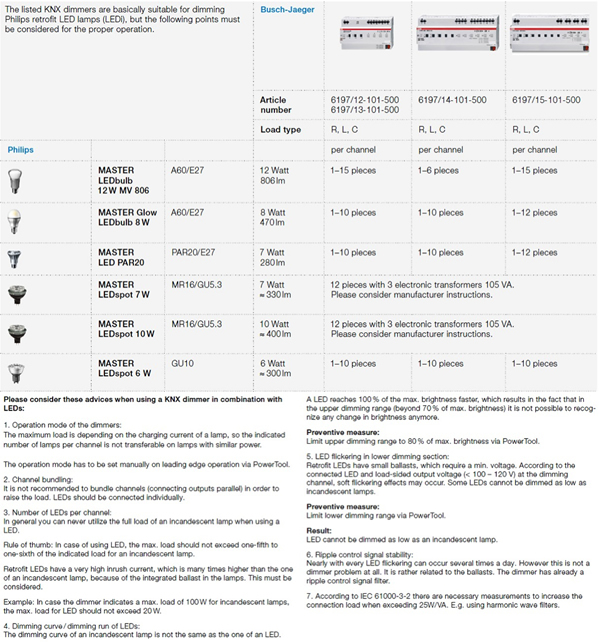
Figure 6 shows the approach of the ABB brand, and it is interesting to read carefully the general guidelines for LED dimming with its universal dimmers. Please note that in this table, ABB had tested only some lamps of the Philips brand. If you want to use LED lamps of another brand, you should perform the compatibility tests yourself. And that is a general rule. Always test before ordering the products!
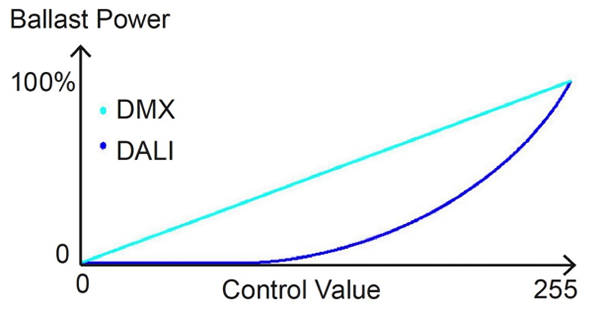
In Figure 3, line 9, the lighting designer demands 0-100% dimming range with 1-10V control. That is not easy to achieve due to the fact that 1-10V control has a lower dimming value of approximately 10%. If 0-100% is a must and cannot be changed, then maybe a DALI or a DMX control could deliver better results as shown by the DALI and DMX dimming curves in Figure 7.
Conclusion
Lighting is key to the character of a building, and good cooperation between the lighting designer and the systems integrator will significantly increase the likelihood of a happy customer whilst maintaining the good reputation of the professionals involved.
The Lighting Table Tool can help the two design parties ask the right questions, listen to each other very carefully, and help them solve any lighting control issue. Please bear in mind however, that this tool is a theoretical one, so it is very important to test any lighting control technology, especially dimmer/LED-lamp combinations for compatibility, BEFORE products are ordered and installed!
I hope this helps, but if you have any suggestions or ideas for this tool, please leave a comment below this article.
George Lazos is an Electrical Engineer, Data Networks Engineer, KNX Tutor++ and Founder of Quantum KNX++ Training Centre. Quantum provides training, coaching and consultancy for smart buildings and smart cities, business development, marketing and project management, in the fields of building engineering and systems integration.


