 By Mark Warburton, Ivory Egg.
Working at a distributor means that I get to see a lot of product, but very rarely do I actually get to commission and test them. Usually, it’s only when something goes wrong and we need to help a customer solve problems. And even then, the majority of testing is just done in ETS, as there is rarely the need to actually connect to a product, given that the majority of support we offer is based around using a product for a specific application as opposed to a product not doing what it is supposed to.
However, one product with which I was very interested to play is the HPD2 KNX from Steinel. The concept of this product has been around for over six years and it is now finally available. It has a very unique application which isn’t surprising, given Steinel’s tendency to do things a bit differently from the rest.
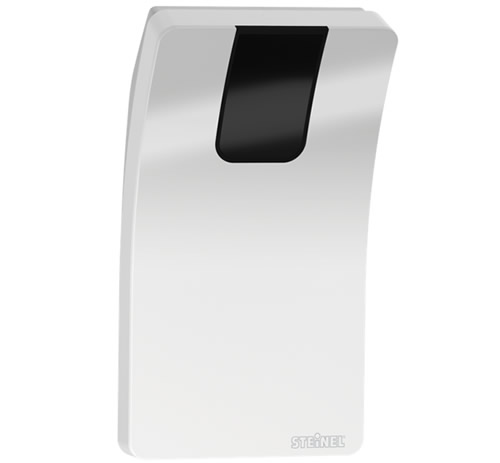
A first of its kind, the HPD2 KNX is a camera-based sensor that uses the shapes of the human body to determine presence and also count the number of people in a room. What’s unique is that this is all being done internally in the sensor, with no connection to an external system or resource. It does this by comparing over 150,000 positive images of the human shape and 7 million negative images. The area of detection can be split into 5 different zones, each with their own presence indication and body count – which introduces some interesting applications.
Product attributes
But first the actual product. The product design is more functional than stylish which makes sense given that it is obviously more suited to commercial applications. The white plastic cover is quite thin which means it shows some slight discolouration, but this wouldn’t be noticeable given the installation height of the product.
Installation
The device requires both the KNX bus connection and an additional 18-57V DC feed which can be delivered via the yellow and white pair of the standard KNX four-core cable. It has to be wall-mounted with a mounting height of 2.3 – 6m for a detection range of up to 10m and a coverage angle of 110 degrees.
The device is really easy to mount, with two brackets supplied for either flat wall or corner mounting. The device sits over the bracket with a small grub screw to hold the two together. A cable retention point in the base would be useful, especially for hollow walls where cables have a tendency to drop in the wall, but this is a minor complaint.
To commission the HPD2 KNX, some set up has to be done directly on the device, with the rest done in ETS. The direct connection is via a USB connection port on the front of the unit, making it easy to access once the unit is mounted. This connection uses the RNDIS (Remote Network Driver Interface Specification) protocol which converts Ethernet to USB – quite different to the plug and play connection used on most USB devices. The configuration of the interface is done under ‘Network & Internet’ settings, where you will need to change your own IP address to be on the same subnet as the device. Once this is done, it’s possible to access the device via a browser.
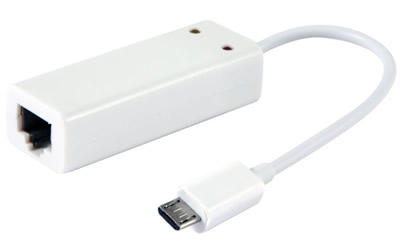
Alternatively, you can use a USB-to-Ethernet adaptor such as the Allnet ALL0174/USB
to connect the device to a standard IP network however if you wanted to leave it permanently connected to the network there would be a cable looping from below the device back into the bracket.
Once you have logged into the device, you can change the network settings, enable KNX programming mode, adjust the sensitivity of the detector and see the image from the camera.
Setup
On the camera image you are able to define up to 5 detection zones and 3 non-detection zones. This is done by simply marking out the area as you can see in the image below, and it’s easy to delete and read zones in any order. In this case, I have market out the 3 desks as detection zones along with a non-detected zone around the doorway.

The changes are saved directly in the device and the rest of the commissioning is then done in ETS. In the ETS parameters you can enable each of the 5 zones and configure them with separate timeouts, constant lighting control, basic light level and disable functions.
You can also set up a total zone which can include some or all of the individual zones. This can provide a presence and total number of people detected, along with threshold and ventilation objects which can have 3 levels based on the number of people detected, and can send on/off or values for at each threshold.
There are also settings for calibrating the humidity and temperature sensors, along with a sabotage function which sends an object to the bus at a fixed frequency. If it stops, then something has happened to the device.
Overall, the parameters are very clear and self-explanatory, with plain and simple language used. The manual could be a bit more descriptive about some of the functions, but it is more than adequate to commission the device and get it up and running quickly.
Visualisation
One thing to be aware of is the actual camera image and zone layout information is only accessible via the configuration page. If you wanted to visualise this, you would need to get the image (i.e. using a screenshot or separate camera) and then overlay the information of zone activity or number of people via the KNX bus. This could be done easily on most KNX visualisation solutions.
Direct IP connection
There is another version of the product available which connects directly to an IP network. An API is available which uses JSON (JavaScript Object Notation) to provide the presence information and lux level in each zone, along with the temperature and humidity. This allows the HPD2 to be integrated with systems other than KNX, making the unique applications of this device relevant to the wider building control industry. The HPD2 KNX will accept the same queries, but as stated, it’s not as easy to get on the network permanently.
Applications
The potential applications for the HPD2 KNX are quite wide ranging:
• Using the overall presence detection and people counter, room occupancy tracking and intelligent ventilation or cooling is straightforward.
• The ability to break up the area by zone makes queue control possible. For example, notifying staff to open another counter if there are more than two people in a waiting area.
• Presence-based, localised control of lighting and HVAC over individual desk spaces is another potential application which would increase the comfort in work environments and also offer energy savings.
• It could even be linked to an audio system in order to provide dynamic volume control of a PA system, based on the number of people in an area.

Conclusion
In summary, the entire Steinel HPD2 KNX device is well thought out, and with such powerful functions and applications, it is actually quite exciting to configure. The build quality could be improved slightly, but this is really a minor issue when considered against the number of positive attributes of the device. The JSON API is a real plus, and opens up the device to an even larger audience than just KNX.
With such a diverse range of control already possible within the KNX ecosystem, it seems unlikely that a single device could completely change what it is possible to achieve with the system. However, the HPD2 KNX, with its combination of a traditional approach to presence and lighting control with an extremely modern ability to identify the shape of people, has managed to do just that.
Mark Warburton is the Technical Director of Ivory Egg (UK) Ltd, a supplier of leading KNX products and provider of KNX training courses.


