 By Mark Warburton, Ivory Egg.
There are a lot of things that make KNX stand out against other systems – the key one being the standardisation of the system. However, one of the consequences of this is the time it can take for updates to the standard to be actually realised as products or solutions. KNX Secure is a prime example of this, as we have been waiting many years since KNX Association first announced this new approach to maintain the security and integrity of a KNX installation. That being said, KNX is still massively ahead of the curve with very few proprietary systems offering anywhere near the level of protection you can now add to a KNX system.
With the number of KNX Secure products being released starting to increase, let’s take a look at how to configure these products in ETS. But first, here’s a quick catch up on what KNX Secure is.
KNX Secure basics
KNX Secure is an extension to the KNX standard which allows for IP communication or telegrams on the bus to be encoded using AES128 encryption. The need for this has arisen as consumers demand secure solutions. Although it has always been possible to create secure remote access to a KNX installation using standard IP approaches such as VPNs (Virtual Private Networks), there are still numerous KNX installations around the world that have been configured for open access from the Internet, either inadvertently or deliberately to make remote access easier. As this presents an inherent security risk both to individual projects and the wider reputation of KNX as a robust system, the KNX Association has developed an embedded security layer.
KNX Secure has two aspects, namely IP Secure and Data Secure.
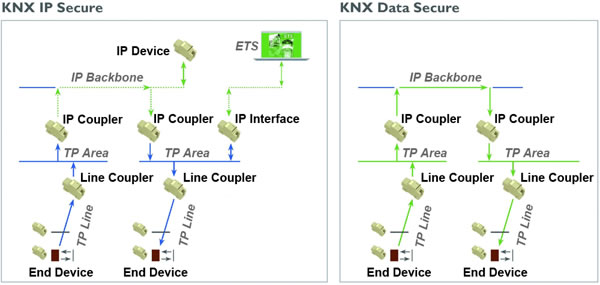
KNX IP Secure
KNX IP Secure encodes all KNX IP traffic in a security wrapper ensuring only authorised devices and applications can read the messages. This is true for multicast or tunnelling connections and can also apply to ETS commissioning connections so that all downloads to devices are protected.
KNX Data Secure
KNX Data Secure works at the individual object level, allowing the data in individual telegrams to be encoded across all communication media. This could be used to protect sensitive data or to restrict access to central-system-wide functions, leaving the rest of the KNX system communicating in the standard way.
In both cases, there are various security mechanisms that ensure telegrams can’t be manipulated or repeated, and the KNX Association has worked hard to ensure the configuration is as straightforward as possible whilst maintaining the highest level of protection.
To work with KNX Secure products, it is essential to be working with the latest version of ETS, which is currently 5.7.0, and to keep ETS up-to-date, as there are constant updates and improvements being made.
Configuring KNX Secure
In this example, we will look at how to create a secure IP backbone line with the IP router also supporting tunnelling connections. We will also see how to create a Data Secure Group Address.
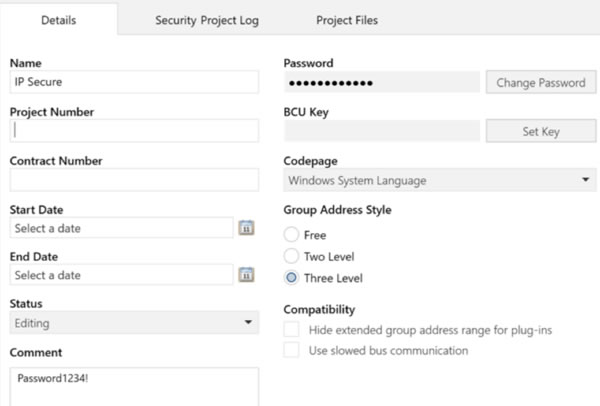
Before you can even add KNX Secure devices to ETS, you will need to add a project password on the main details tab. As ETS is effectively the administrator in a secure installation, it’s critical that access isn’t possible without permission. This does present the first hurdle in the wider uptake of KNX Secure as a lot of external systems, such as BMS or visualisation systems that import the KNX project to create links to Group Addresses, don’t support ETS project passwords. However, this is a challenge for the manufacturers to overcome, as it’s beyond the scope of the KNX Association.
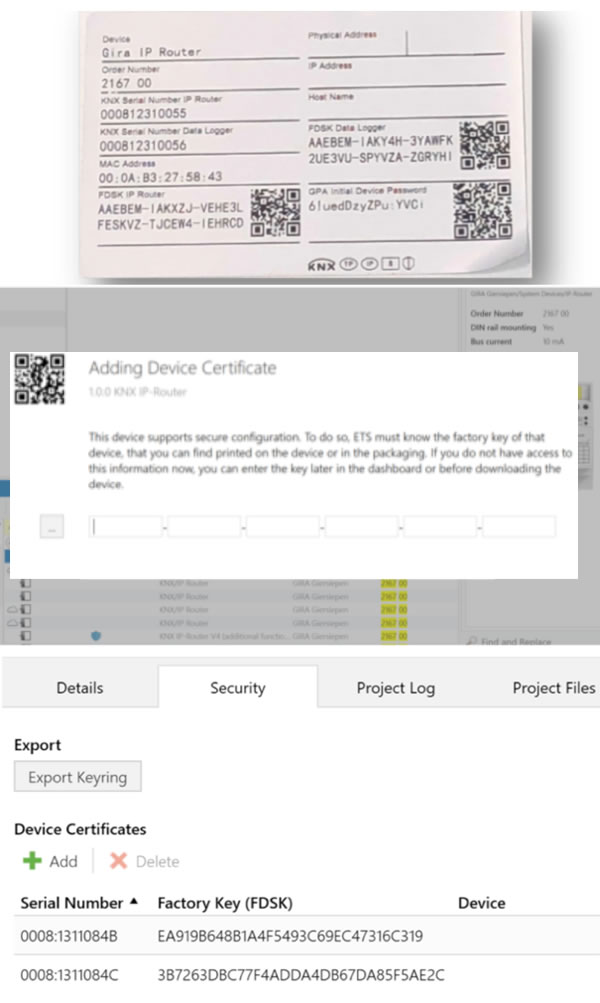
Adding the FDSK
The next step is to add the Factory Default Shared Key (FDSK) from secure products into ETS. This is the default key that is printed on a device, and/or supplied on a separate card, and is used to initially authorise a device. After this first use, ETS uses device keys which are known only to the secure devices and ETS.
The FDSK can be added to ETS either on the main security tab or as you add individual secure devices. Either way, you can use a USB camera or handheld scanner to read the QR codes to save typing the 32-digit code.
Adding products
If you have already added the keys, when you add the products from the Catalog, it will still prompt for the FDSK as this is only linked when addressing the device, however, it is possible to hide this prompt. You will notice that when searching for KNX Secure devices in the Catalog, they will be displayed with a padlock.
Enabling KNX IP Secure functions
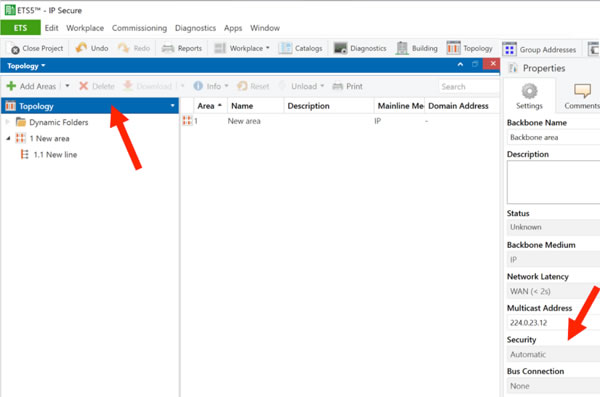
Once the products are in the project you can enable secure functions on the main line or backbone line by selecting it in the topology view and then changing the setting on the detail tab. By setting it to automatic, ETS will use security when possible, i.e. when all of the devices support it.
The remaining settings are made on the individual devices. You can choose to use secure commissioning on the main setting tab and then add a password on the IP tab.
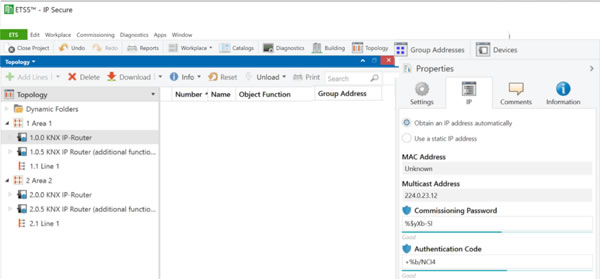
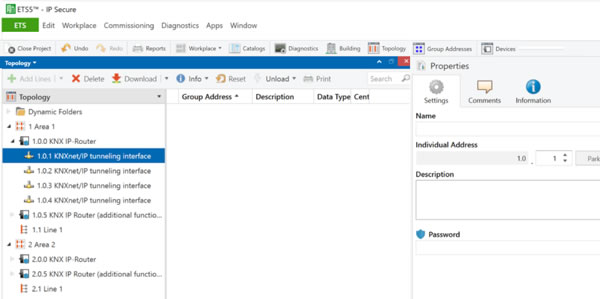
You can also separately enable security on individual tunnelling connections, either for commissioning or for third-party systems to connect. In this case, you will need to add an authentication code on the main device IP tab (see image above) as well as a password for each tunnelling connection (see image below).
Being able to enable these individually is key, as it will take a long time for external systems to be updated to support KNX Secure, so a mixed security architecture is likely. Again, this is outside of the scope of the KNX Association, so it will take pressure from the market for third-party solution providers to update to the KNX Secure standard.
Enabling KNX Data Secure functions
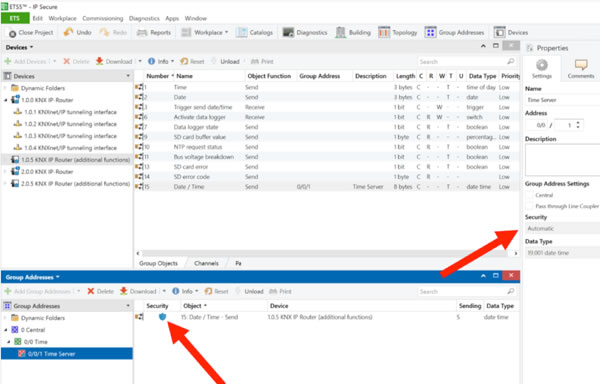
KNX Data Secure is even easier to work with. In the settings tab of a Group Address, you can set security to Automatic. Then, as long as all objects are from secure devices, security will automatically be used on that specific Group Address.
Diagnostics
Because ETS, and the project, hold the security details, any diagnostics have to be done from within the project environment in order to ensure that the keys can be used. Also, the individual address and line scan functions in ETS aren’t currently compatible with KNX Secure, although this should be remedied in a future update.
Conclusion
With multiple manufacturers releasing IP routers in the last month, it is exciting to see real-world application of the KNX Secure extension to the KNX standard. Granted, it will take some time for wider compatibility of the solutions and for integrators to start deploying it, but it is real progress on an issue of which consumers are increasingly aware. KNX Secure presents a great opportunity to show how KNX is leading the way for building automation solutions, even with the added complexity of being an open-protocol, standardised solution.
For more information on KNX Secure and other ways to protect a KNX system, check out my Tutorial: Securing KNX Systems.
Mark Warburton is the Technical Director of Ivory Egg (UK) Ltd, a supplier of leading KNX products and provider of KNX training courses.


